
The character looks great in the first frame, but in the second, she has a different nose, hair, or jacket? Before you create a series of images or a film, prepare a reference card: several organized views of the same person, a description of features, and a list of elements that must not change. We will show ready prompts, the process of transitioning from card to video, and other cards useful for products, locations, and entire campaigns.
The illustrations are original examples. A reference card increases the chance of consistency, but no current generation guarantees an identical face in every scene.
What is a character card?
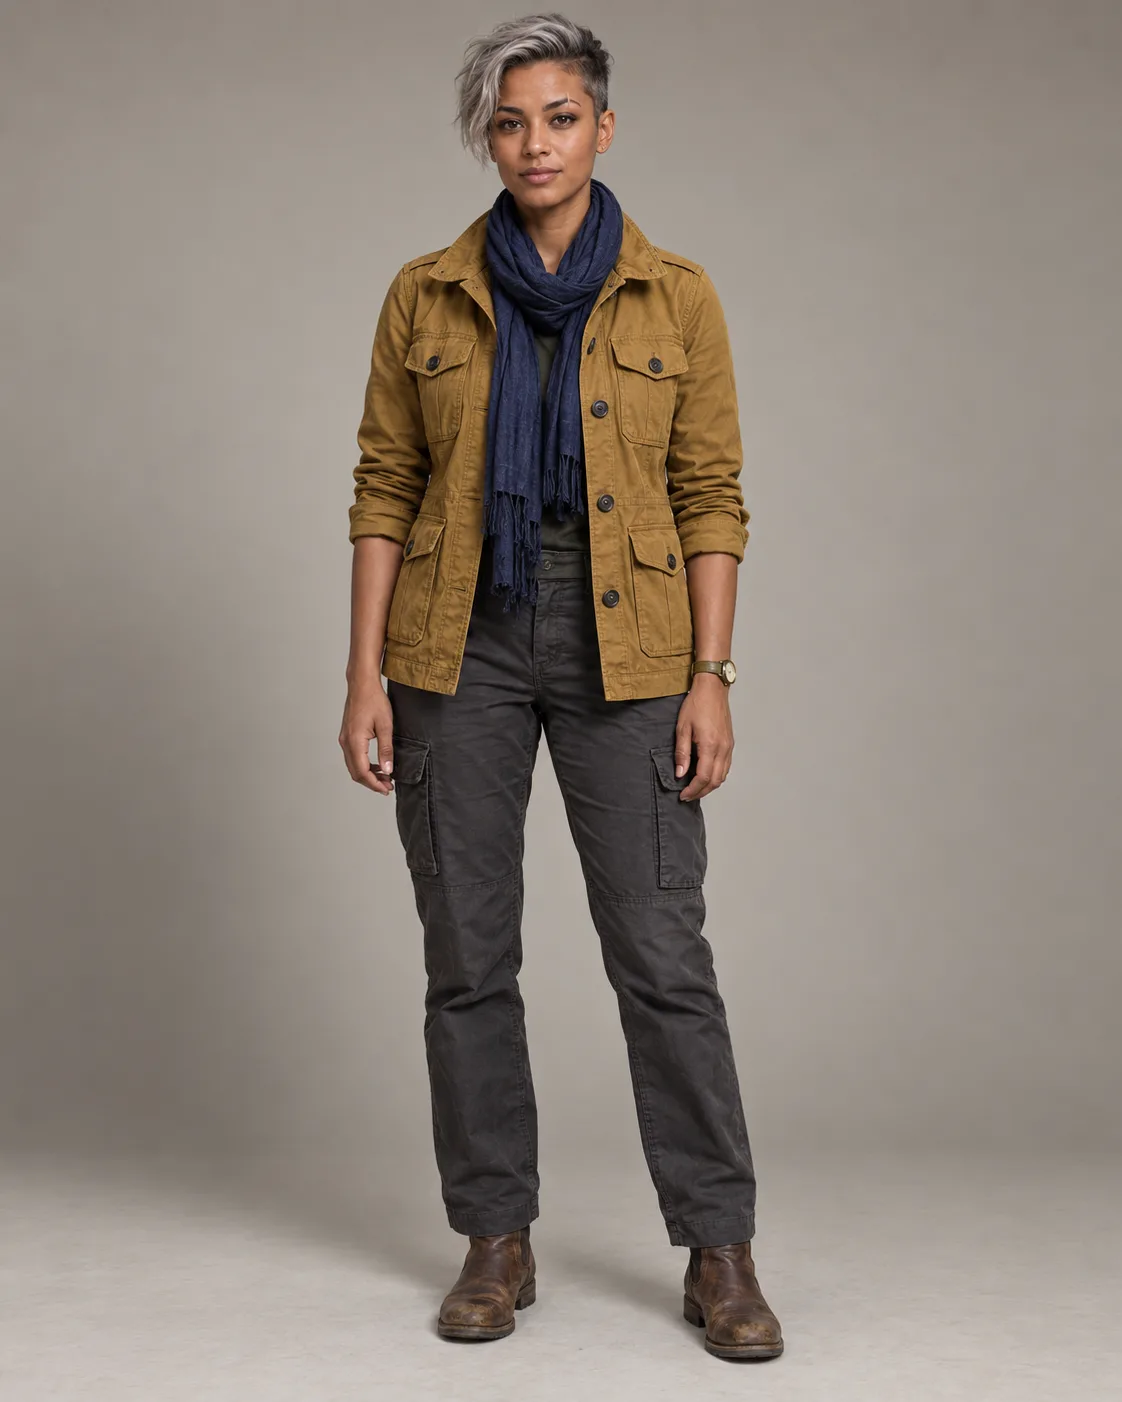
It is a working document for subsequent generations. Instead of writing "woman in a jacket" each time, you show the model a specific person: a front and side view of the face, silhouette, clothing, important details, facial expressions, and colors. The card also helps a person notice errors: if a scar suddenly changes the eyebrow, you immediately know what to correct.
First, choose a good source image
The best reference shows the face, hairstyle, and most of the outfit in even lighting. Sharp sunglasses, a hand covering the cheek, or a very dark filter will hinder the recreation of features. If you only have a portrait, do not expect an accurate look of the shoes: the model will have to invent them. Note this uncertainty on the card.
Our character has a medium complexion with a copper tone, a short silver undercut, a small scar crossing the right eyebrow, a mustard field jacket, a navy scarf, and dark pants. These are features that can be visually checked. The term "charismatic" may help with the mood, but it does not serve as a visual block.
Break the card into readable parts
| Part | Purpose | What to check |
|---|---|---|
| Profile | One-sentence description and permanent features | Are there any features not visible in the photo? |
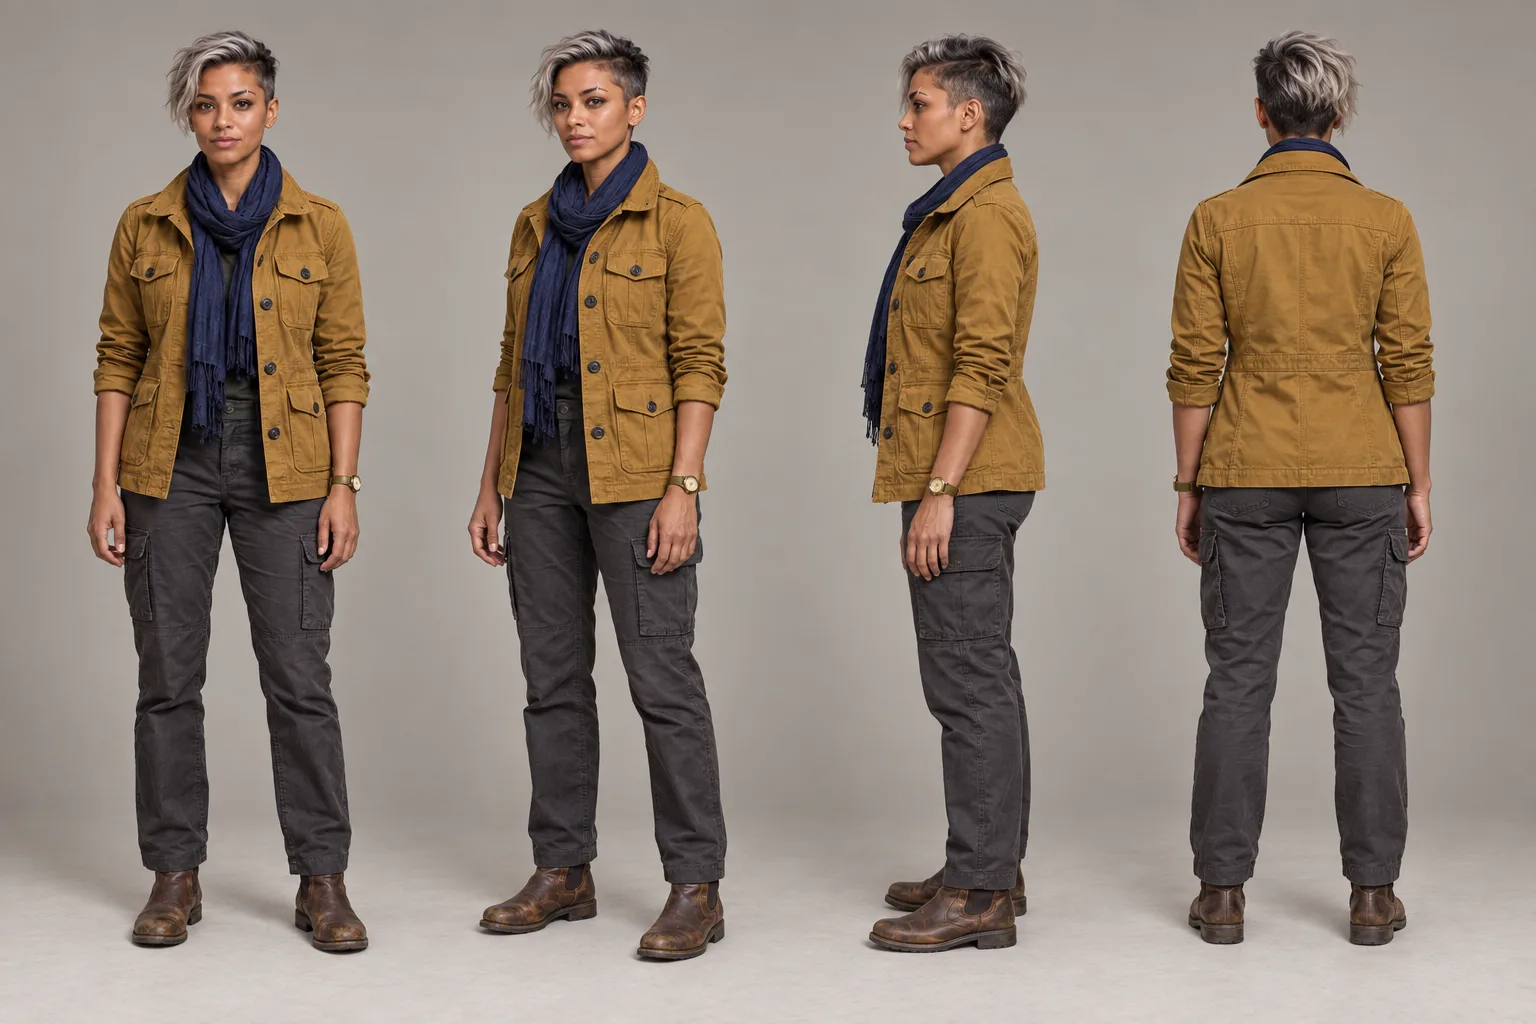
| Body rotations | Front, three-quarter, side, back | Height and length of clothing in the same scale. |
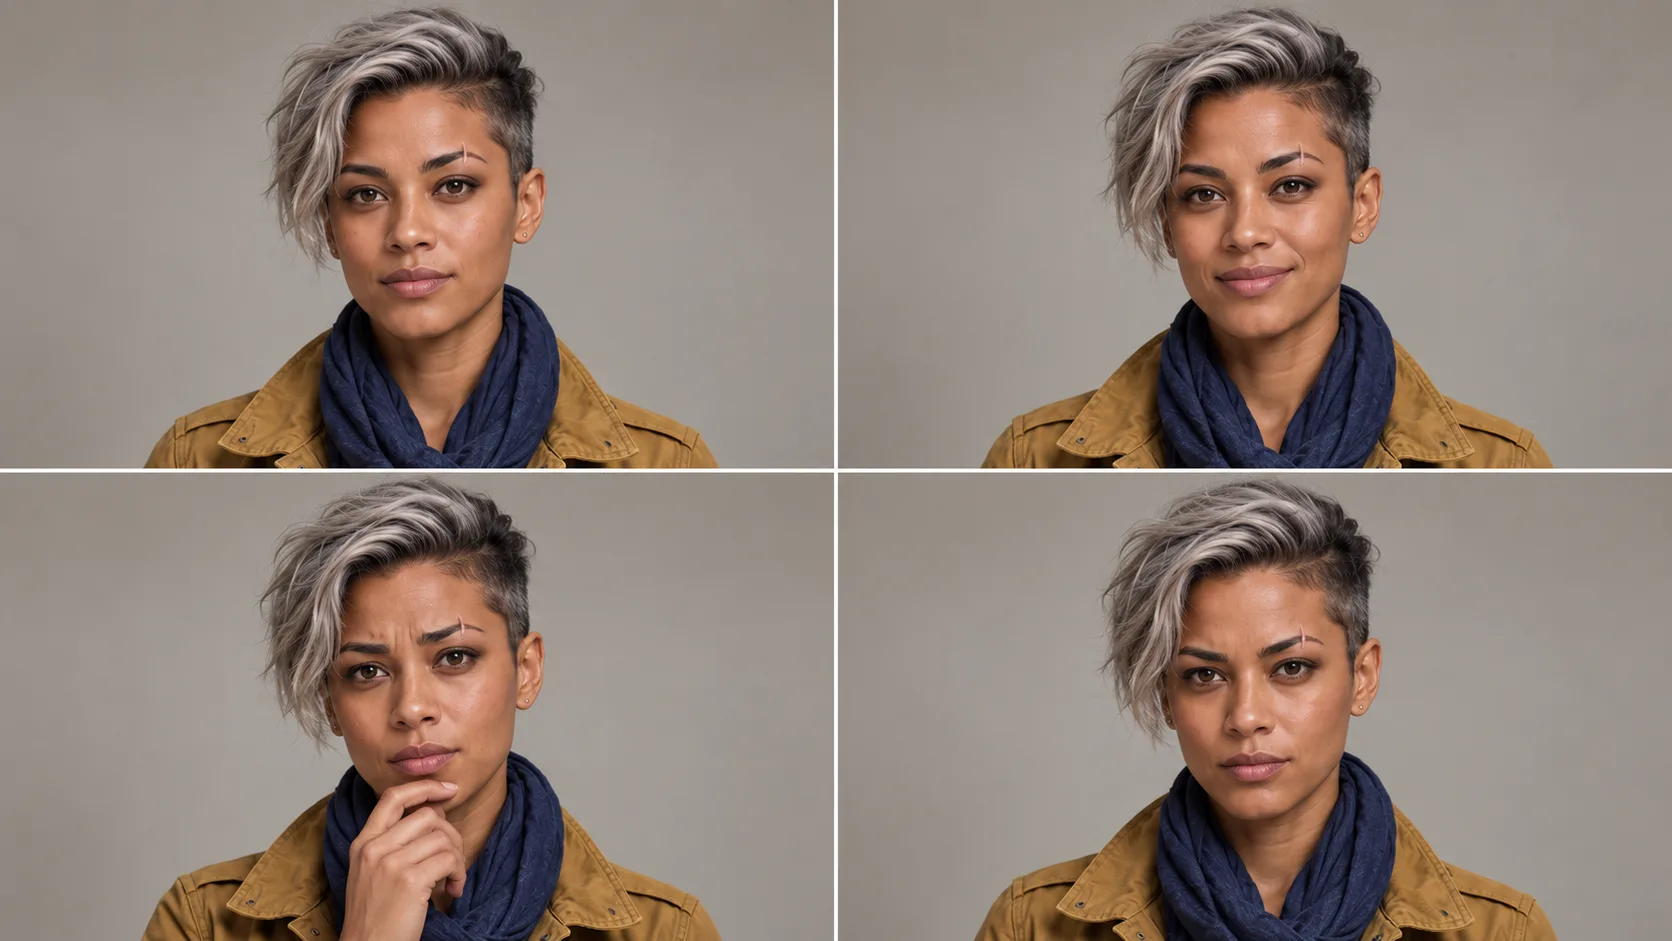
| Close-ups of the face | Geometry of the face and hairstyle | Eyebrows, nose line, scar, skin tone. |
| Facial expressions | Reactions without changing identity | The same face even when smiling and surprised. |
| Outfit | Seams, layers, fasteners, shoes | The same clothing parts in all panels. |
| Colors | Palette for later scenes | Samples after manually reading the color from the image. |
A large board with everything at once can be impressive, but small faces and text may be incorrect. In practice, it is better to create separate rotations and expressions, and only then compile the approved images into one document. Do not treat HEX codes generated as text on graphics as measurements; download the color with a color picker in the editor.
How to prepare a card in Picsart
Open Picsart AI Playground. If you have access to GPT Image 2, select it, go to editing with the image, and attach your own reference. The names of modes and limits depend on the current panel. First, generate rotations, then expressions. Choose the best results and keep the source image next to them.
Use the attached image as the only source of identity for the fictional heroine. Prepare four full views of the same person: from the front, at a three-quarter angle, from the side, and from the back. All views in the same scale, neutral posture, entire shoes and top of the head visible, uniform bright background, soft studio light.
Maintain the same facial structure, skin tone, short silver hairstyle, scar on the right eyebrow, mustard jacket, navy scarf, dark pants, and shoes. Show the logical construction of the outfit from the back and side. No alternative clothing, new accessories, other characters, or text. If a detail is not visible in the reference, fill it in as sparingly as possible.
Based on the attached reference, prepare a grid of four portraits from the shoulders up. It is exactly the same fictional heroine and the same outfit in each panel. Emotions: neutral, mildly amused, worried, determined. Change the muscles of the face, not its structure. The same scar on the right eyebrow, eye color, hairline, skin tone, and lighting. Bright neutral background, no captions or additional people.
Variant for the series: eight emotions and six poses
Four portraits and several views of the silhouette are enough for the first short shot. If the heroine is to return in many scenes, expand the material only when you know what reactions and movements the script requires. For example: a calm conversation requires glances and smiles, while a discovery scene may need surprise, worry, and determination. Do not generate dozens of poses just to fill the board.
For our heroine, we prepared two separate sheets. The first shows eight changes of expression, the second six body positions. This is still material for selection, not a promise that the video model will copy every expression or gesture. In a large grid, faces and clothing details are small, so for the proper shot, choose the approved panel and save it as a separate image.
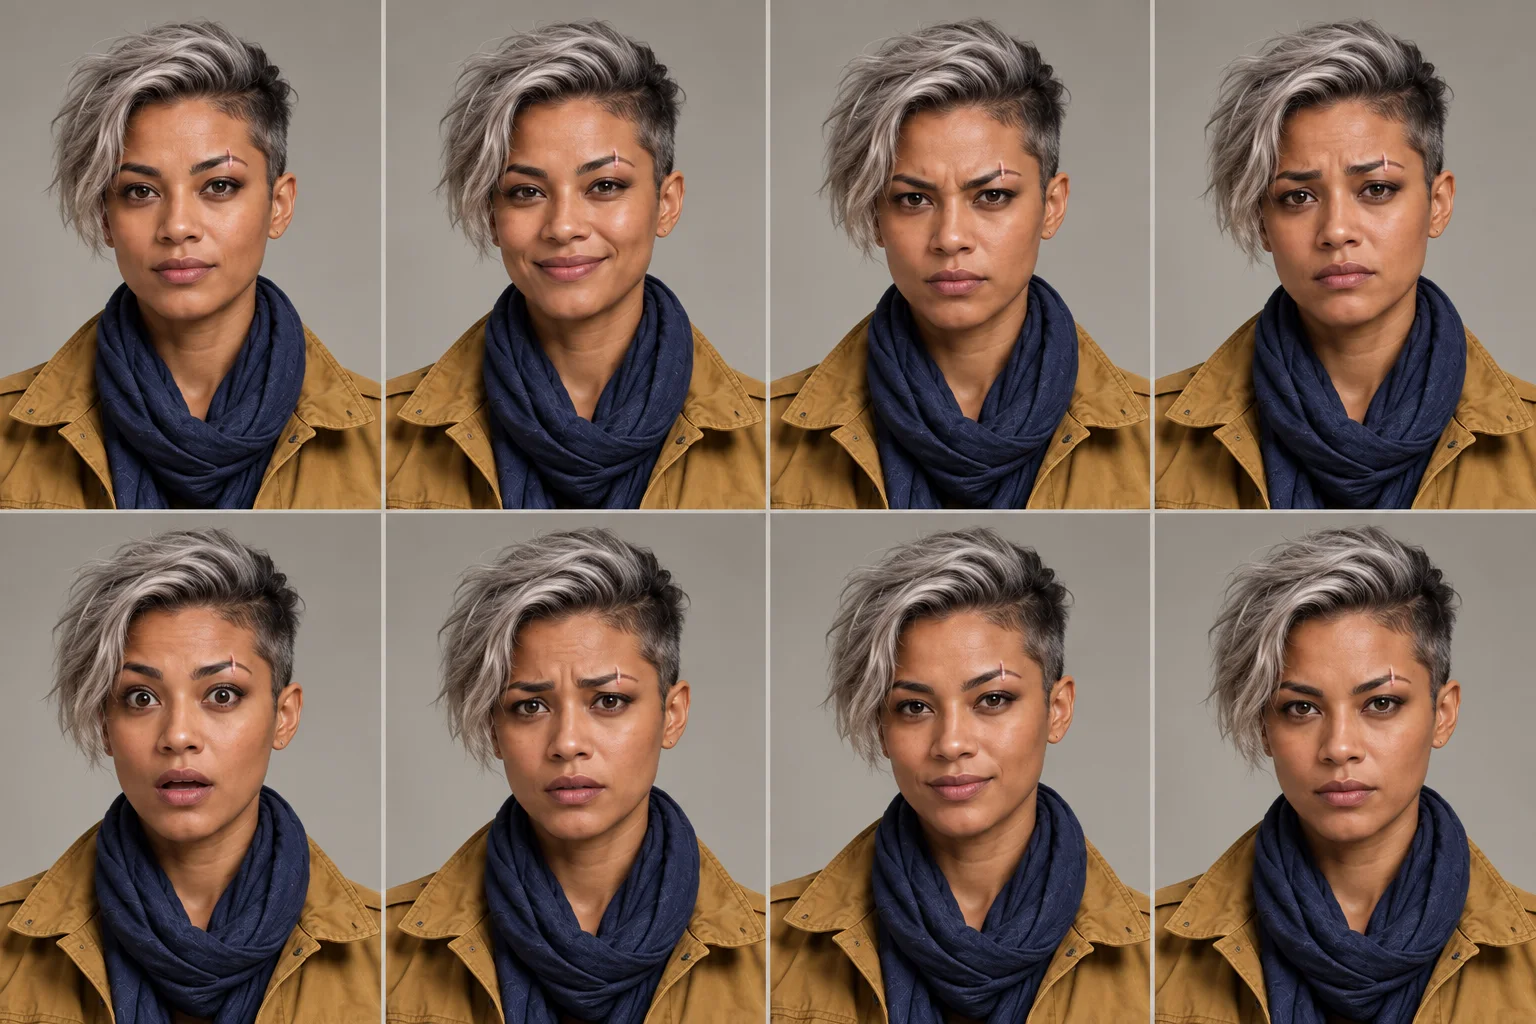
Use the attached approved portrait as the only reference for identity. Prepare a horizontal sheet of eight large head and shoulder portraits in equal fields, four columns and two rows. In order from left to right: neutral, mildly joyful, angry, sad, surprised, worried, confident, determined. Change the expression of the eyes, eyebrows, and mouth, but maintain the shape of the face, age, skin tone, short silver hairstyle, scar on the right eyebrow, mustard jacket, and navy scarf.
The same camera distance, soft light, and neutral matte background in each field. The entire head and both shoulders must fit in the frame. No captions, foreign faces, new decorations, hairstyle changes, or skin beautification. If eight portraits become too small, create two boards of four emotions instead of shrinking the faces.
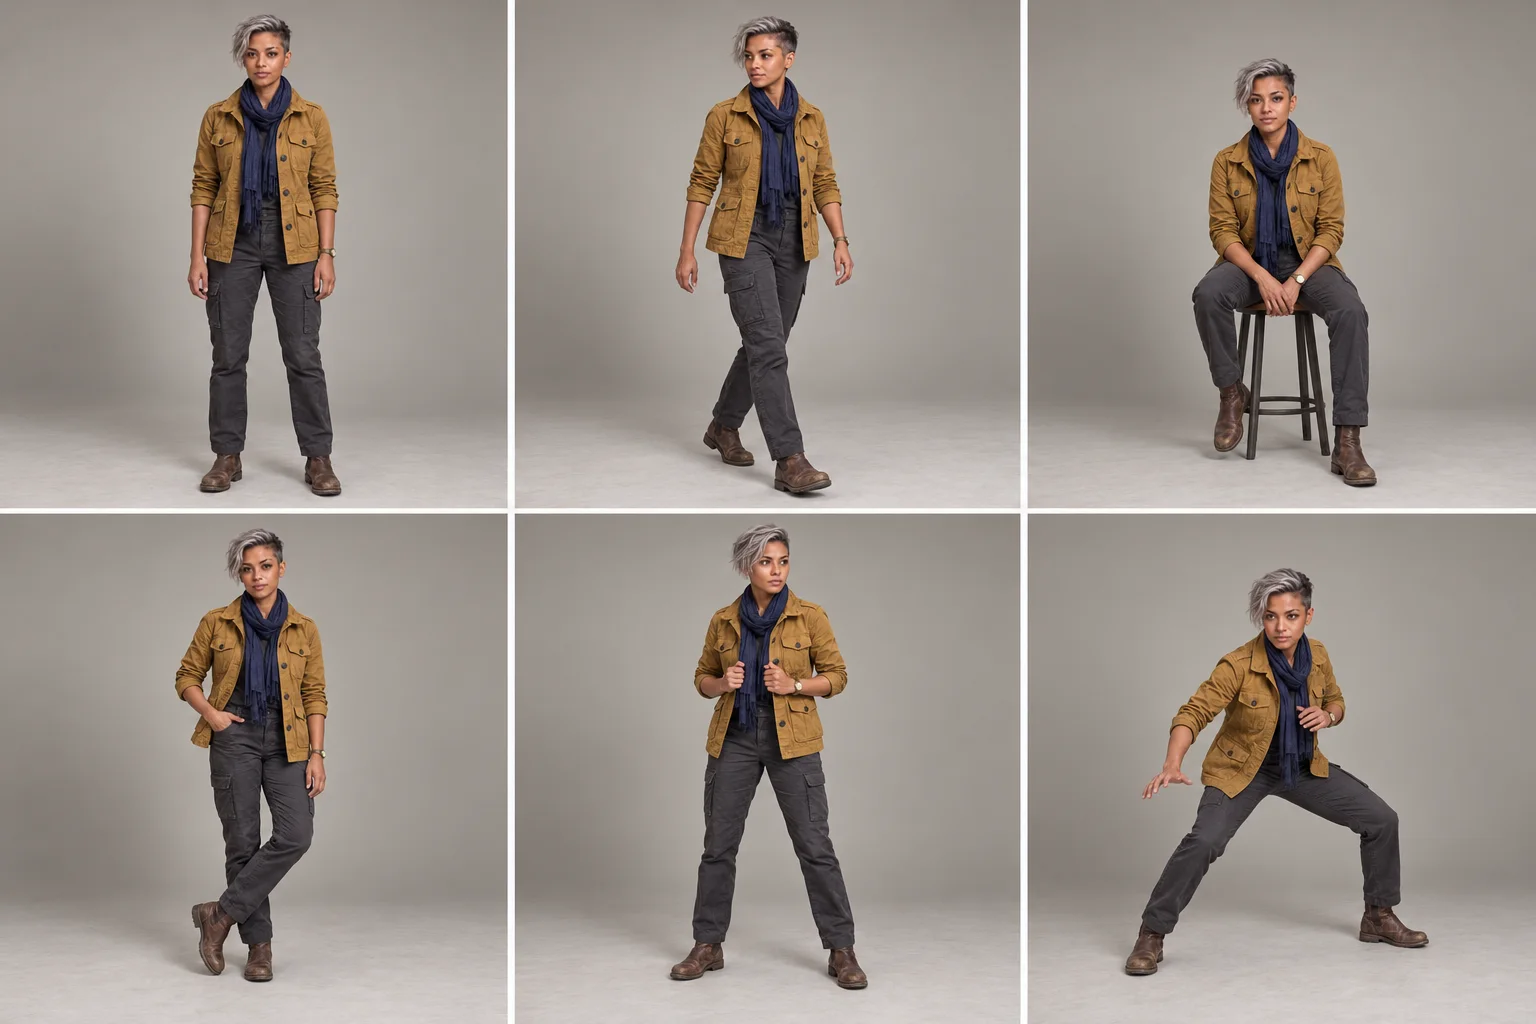
Use the approved image of the full character as a reference for silhouette and outfit, and the approved portrait as a reference for the face. Create a horizontal sheet of six full views of the same fictional heroine in a layout of three columns and two rows. In order: neutral standing front; natural step; sitting on a simple stool; relaxed posture with weight on one leg; alert, tense posture; readiness to move without weapons or props.
Each panel shows the entire head, both hands, and full shoes with extra space at the edges. Maintain the same body structure, age, silver hairstyle, mustard jacket, navy scarf, dark pants, and brown shoes. The same scale of the character, neutral background, and diffused light. The pose and expression may change, but no character gets a different outfit or new items. No text and additional people.
How to check the result? Match the neutral expression with each emotion: the eyes, nose, jawline, and scar should remain recognizable. Then compare the standing character with the other poses: the length of sleeves, number of pockets, and layers of clothing should make sense even while moving. If two panels differ, correct that panel or generate it separately. Do not accept the entire sheet just because it looks impressive from a distance.
Example of use in film: in the first six-second shot, the heroine calmly reads a sketch at the table, in the second she hears something behind the door and looks up, in the third she stands up and takes a step. For the first shot, use the approved neutral portrait and sitting view; for the second, the worried portrait; for the third, the standing view and step. In each prompt, describe the movement between states, not instruct the model to recreate the entire grid of poses. Save the final frame of each accepted shot as a reference for the next.
@Image 1 is the approved neutral portrait: only identity, hairstyle, and scar. @Image 2 is the approved portrait with worry: a hint for the final reaction of the same person, not a new heroine. @Image 3 is the view of the sitting silhouette: mustard jacket, navy scarf, dark pants, and body proportions. Do not copy the gray background of the boards into the scene.
One continuous shot, 6 seconds, format 9:16. The heroine sits at a table in a small archive and for the first two seconds reads a sketch of a plant. She hears a quiet sound behind the door, slowly raises her gaze, and turns her head towards it. In the end, she is slightly worried, but still sitting; she does not stand up in this shot. The camera is stationary, medium shot, the window lights her face from the left. The same face and outfit from the first to the last frame, natural change of expression between the two states. No cuts, new people, additional dialogue, or sudden changes in lighting.
One full board: prompt to copy
If you need one file to show the team, you can try to gather the material into a 4:5 board. Treat it as the first draft of the document: the generator may misinterpret a small profile, the side of the scar, or text. Usually, it is better to prepare and approve separate images, and then compile the full board from them in an editor. However, if you still want to make the first attempt in one step, use this original template:
Attach one clear photo or illustration of the character. Create a vertical production board 4:5 dedicated solely to this one person. The source image is the primary reference for the face and visible parts of the outfit. Do not copy its background.
Arrange the board into clear fields: (1) main portrait and short profile with space for manually entering the name, role, and features; (2) full silhouette from the front, at a three-quarter angle, from the side, and from the back, in equal scale; (3) three close-ups of the head showing the geometry of the face, hair, and distinguishing mark; (4) four facial expressions: neutral, joyful, worried, and determined; (5) three simple poses: standing, walking, and sitting; (6) details of the outfit, shoes, and accessories; (7) samples of main colors and materials. Leave empty fields for signatures and color codes, which we will fill in manually after checking the image.
In each field, there must be the same character: the same age, face shape, skin tone, hairstyle, proportions, outfit, and placement of distinguishing marks. If the back of the clothing is not shown in the reference, suggest the simplest logical completion and do not present it as a confirmed fact. No new person, alternative outfit, beautification, aging, style changes, additional props, or invented text. Neutral background, soft light, clear layout, and large face panels. Working name of the character: [ENTER NAME].
The main limitation: an image from one shot does not contain real information about the back, exact height, or all profile details. The model infers them. If you need documentation of a specific person or costume, add real photos from several sides. Do not treat the generator as a 3D scanner.
How to turn a card into video: practical process
The card is not a film or a 3D model. It helps to select consistent references for every shot. In a video tool like Higgsfield, you can upload images and assign them roles; capabilities and file limits depend on the model. For example, Seedance supports image inputs and references but does not guarantee one hundred percent face matching. Evaluate the result frame by frame.
- Choose the shot and angle of the face
Start with five or six seconds and one simple action, e.g., the heroine approaches the table, stops, and looks at the sketch lying on it. If the film is to have a profile, attach the approved profile; for a look at the camera, attach the front portrait.
- Separate the roles of attachments
The portrait gives the face, the rotation gives the outfit and proportions, the image of the place gives the background. Do not instruct the model to copy the neutral background of the board into the film. If you are using only one complex image, crop the appropriate panel so that the face does not occupy a few pixels.
- Describe the action, camera, and fixed things
Write what the person does from start to finish, what remains in the frame, and how the camera moves. Add duration, proportions, and direction of light. In the lock, mention only the most important features that the model often changes.
- Do a test, correct one cause
Check the face in the initial frame, during the head rotation, and in the last second. Compare the scar, hair, sleeves, and shoes. If the profile fails, change the profile reference; if the outfit, use a clearer view of the clothing. Do not change all parameters at once.
- Save winning frames
When one shot looks good, export a representative frame and use it as the next reference or the first frame of the next scene, if the tool allows. This is often more effective than returning solely to the original large board.
@Image 1 is the approved portrait of the fictional heroine's face. @Image 2 is her body rotation: mustard jacket, navy scarf, dark pants, and shoes. @Image 3 is the interior of a small botanical archive, used solely as a place and source of light. Do not copy the studio background from @Image 1 or the layout of the board from @Image 2.
One continuous shot, 6 seconds, vertical 9:16. The heroine enters from the left, approaches the wooden table, stops, and looks at the open sketch of the plant. The camera is at chest height, medium shot, very gentle movement from the hand. Soft light from the window on the left. Maintain the same face, short silver hairstyle, scar on the right eyebrow, proportions, and full outfit. The right hand is empty, the left remains at her side. No new people, clothing changes, time jumps, cuts, or additional dialogue. The movement has a visible beginning, middle, and end.
If the source is an existing recording of a person, the source film should define gestures and timing. In this case, the card can help maintain appearance during editing but does not replace the person's consent to use their image. In scenes with a recognizable public figure, do not present the generated performance as a real recording or as their product endorsement.
Is one card enough? It depends on the task
A complete character board is useful for animation and recurring shots of a person. A product advertisement or a scene in multiple rooms requires different documents. There is no single mandatory "super sheet" for every project. It is better to select a small set of cards, each with one role:
| Type of card | What it keeps in check | When it is useful |
|---|---|---|
| Character and face | Features, hair, proportions, distinguishing marks. | The same person in many shots or episodes. |
| Outfit and props | Layers of clothing, accessories, what the person holds. | Changing costumes between scenes would be a mistake. |
| Product | Shape, color, materials, cap, print, and packaging. | Advertisement for a bottle, shoe, phone, or furniture. |
| Location | Layout of doors, windows, furniture, direction of light. | Many shots in one room or outdoor setting. |
| Light and color | Light sources, contrast, material palette. | The scene should look the same after cutting. |
| Shots and movement | Frame scale, camera axes, gestures, moments of cuts. | Film with editing, advertisement, or action sequence. |
For a short film with one heroine, usually sufficient are: a portrait, view of the outfit, reference of the location, and a simple shot plan. For a perfume advertisement, a card for the bottle will be more important than eight emotions of the model. For a small campaign, you may have separate PDF pages or several images in folders character/, product/, location/, and shots/. Name the versions and keep the approved set so that subsequent generations do not use random variants.
Example of another card: product
On the product board, we are interested in shape, materials, and distinctive details. The illustration below shows a fictional bottle from our guide on perfume advertising. It is also a good exercise in control: the two upper panels are too similar, although one was supposed to show a three-quarter angle. In practice, reorder the missing view or replace the panel with a real photo. The aesthetics of the board are not enough if the necessary information is missing.
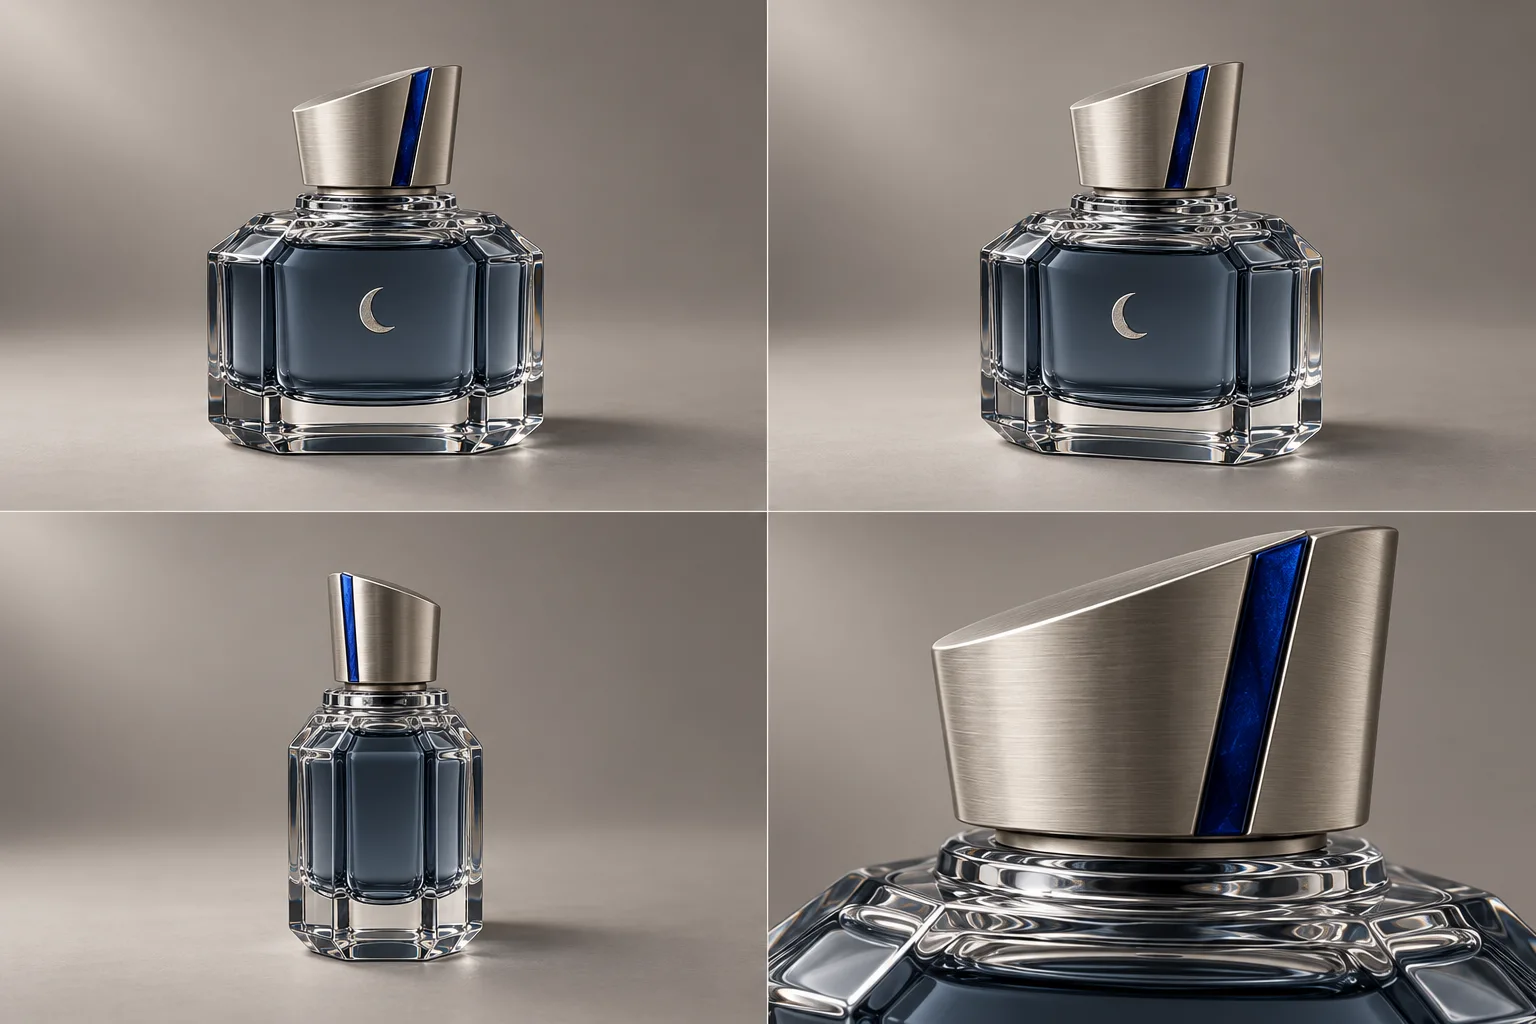
Use the attached photo as the primary reference for one product. Prepare a horizontal board with four large fields: full front view, clear view at a three-quarter angle, true side profile, and detail of a key material or mechanism. Maintain the same shape, scale, colors, number of parts, and proportions. Studio lighting and neutral background identical in all panels. Do not copy the same angle twice; do not add a new version of the product. No captions or invented logos. If the back or profile does not result from the photo, mark that view for later manual verification instead of presenting it as a certainty.
Example of another card: location
For a location, it is not about the face or style, but about the geography of the scene. In our gallery, the window is on the left, the pool is in front of the stone pedestal, and warm light falls from the right. A board from different camera points helps to notice when the model adds a second window or moves the pedestal. The top-down view created by AI should be treated as a sketch, not an architectural drawing.
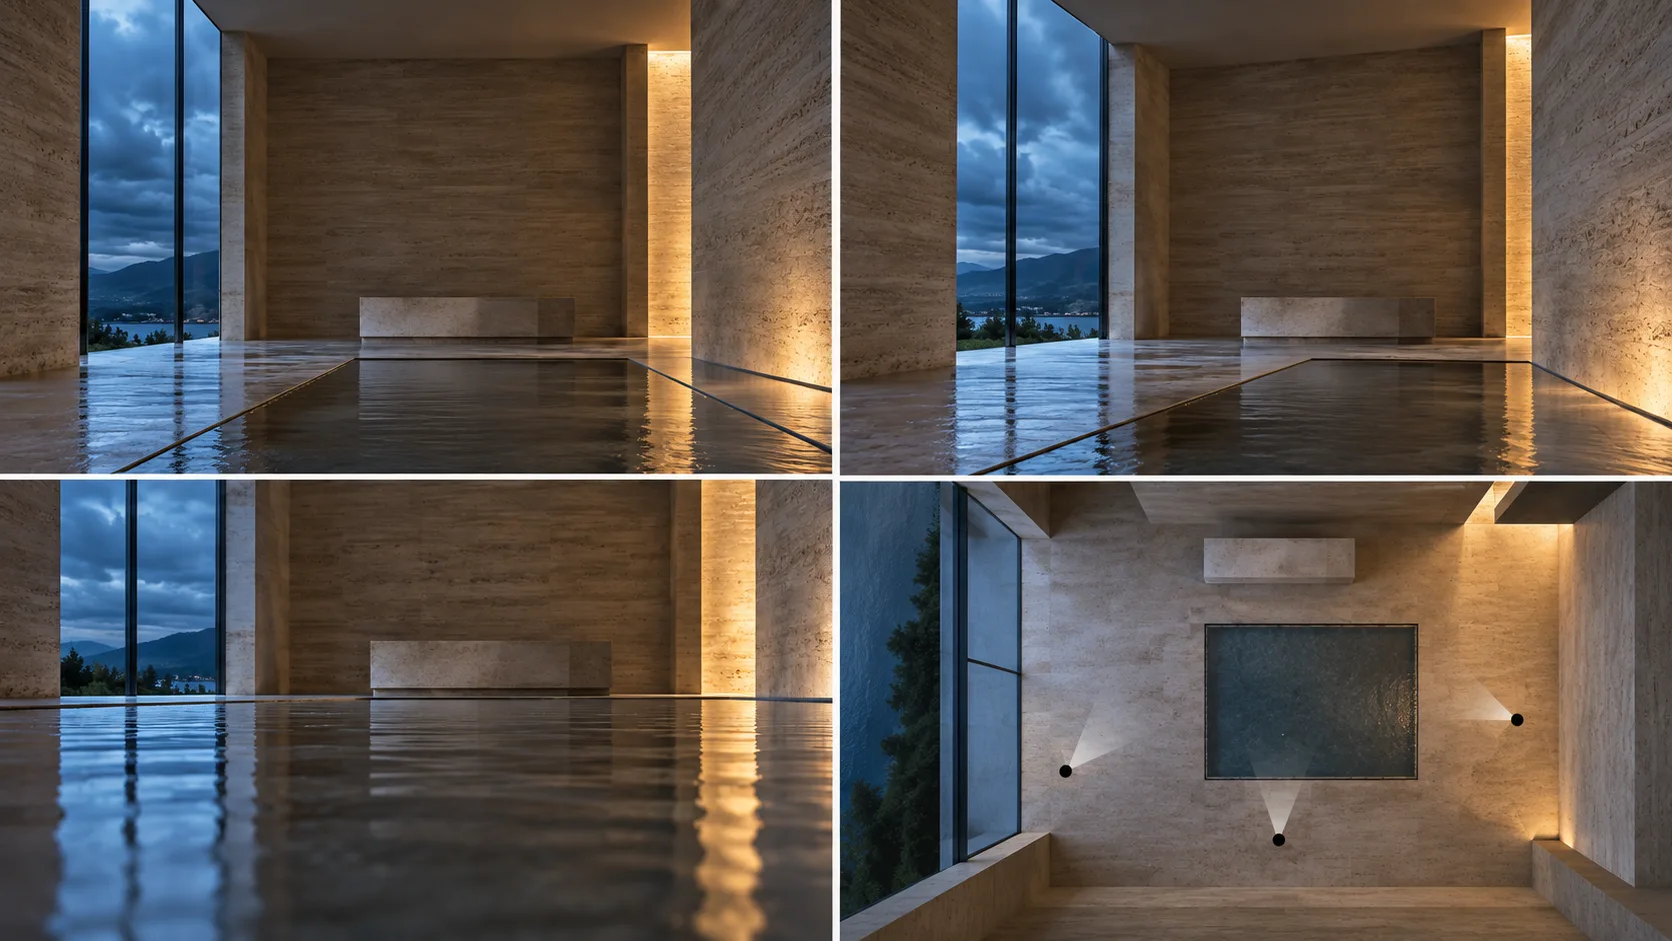
Based on the attached photo, prepare a board of the same location from three realistic camera points: a wide shot at eye level, an angled shot after a slight shift to the right, and a low shot close to the floor. Maintain the placement of windows, doors, pool, pedestal, and directions of light. Add a separate simple sketch of the arrangement of these elements from above. In each view, there is one room, not three variants. No new walls, additional windows, characters, or props. The top-down sketch is auxiliary and requires manual verification.
How to combine several cards in one prompt
Assign roles to images before describing the action. Let one reference correspond to the face, another to the product, a third to the place; do not require the clothing photo to establish the identity of the model. In a film with several scenes, also attach the approved frame from the previous shot if the tool supports a starting image. This helps to connect separate generations. Sample map:
@Image 1 – only the face and hair of the heroine. @Image 2 – only the outfit and proportions of the silhouette; do not take the face of the mannequin or person from the clothing photo. @Image 3 – exact geometry and materials of the product; do not copy the studio background. @Image 4 – layout of one room and direction of lighting. @Image 5 – approved first frame of this specific scene. Maintain consistency with assigned roles; we describe the action, camera, and time below.
You do not have to include all five files every time. Select only those that solve the problem of the given shot. Too many similar but not identical images can introduce conflicting cues. If the interface allows for few references, choose the most important face or product and the appropriate first frame.
Identity lock in later prompts
For a new scene, attach the approved portrait and the appropriate silhouette view. State the role of each image. For example: “@Image 1 is the face and hair; @Image 2 is the silhouette and outfit; do not copy the neutral background of the board.” Only then describe the action and place. Do not add five almost identical but slightly different portraits: conflicting references can weaken consistency.
The character in this scene is a fictional heroine from @Image 1 (face, hair, scar) and @Image 2 (silhouette, mustard jacket, navy scarf, dark pants). Maintain her age, features, skin tone, proportions, and outfit. Do not de-age, beautify, change hairstyle or accessories. Change only the pose, expression, and place described below.
Receiving the card: five questions
- Does the profile and three-quarter face still look like the same person?
- Are the scar, hairstyle, and clothing elements on the correct side?
- Do the hands, legs, and shoes have credible proportions?
- Are the captions and color codes correct? If not, add them manually outside the generator.
- Do you have the right to use the person's photo and publish its derivatives?
The card is a control tool, not a magical "freezing" of the character. In the film, check the face at the beginning, during the head rotation, and at the end. For a quick start, we also prepared a minimalist card of three panels and a separate prop. Also, see our example of swapping two characters in one film, guide to references in AI film, and editing existing footage in Genjutsu.
Comments (0)
No comments yet. Be the first!